|
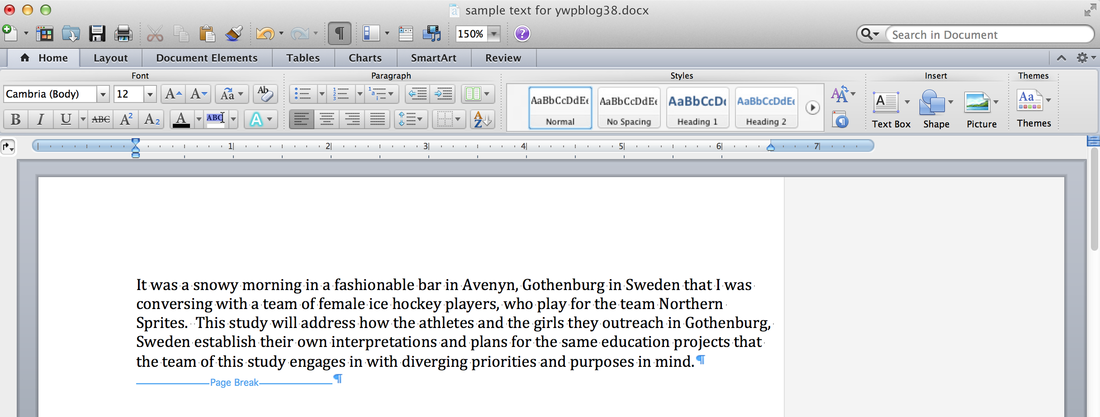
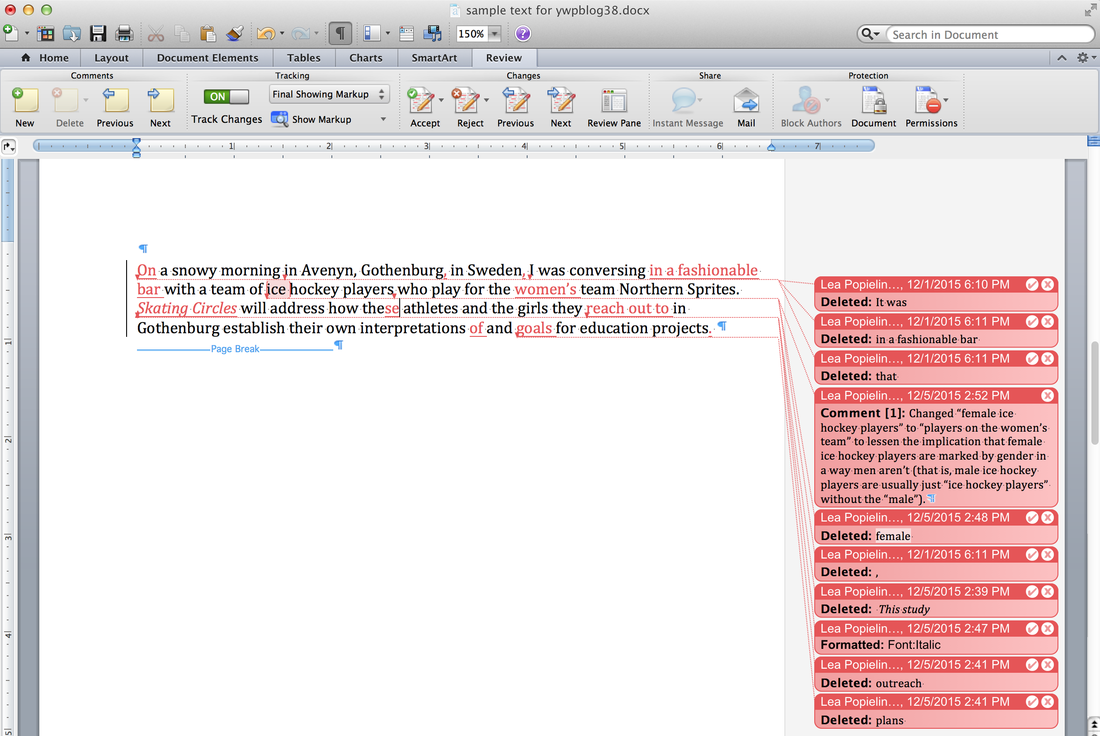
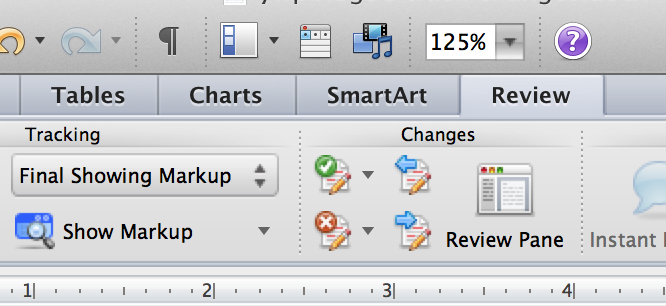
12/31/2015 1 Comment Track Changes for BeginnersWhen you hire an editor to work on your material, they will usually expect you to be working in Microsoft Word, and they will usually plan to edit your material with track changes enabled. The Microsoft Word near-monopoly in editing isn’t absolute, but it’s the industry standard, and if you need to work with a different word processor or platform, it’s best to mention it to your editor up front. For my part, I can work in LaTeX, Wordpress, and Google Docs, but I prefer to edit in Microsoft Word when it’s an option, for one particular tool: track changes. Track changes sounds very much like what it is. Your editor uses it to track the changes they make in your document so that you can easily see where something was deleted, inserted, moved, or changed. If you’ve ever seen a Word doc plastered with colorful lines and bubbles and notes, that’s the work of track changes. How to Read Changes in Track ChangesThe following two images show a passage that hasn’t been edited yet (figure 1) and the same passage edited with track changes (figure 2). The red marks and the descriptions in the bubbles on the right in figure 2 indicate what kind of changes I made. There are types of edits not shown, but we can look at the four most common here: insertions, deletions, formatting, and (not really an edit but handled in the same place) comments. I also provide a short note on moves. Note that although the editing color displayed in this example is red, Word assigns a different color to each person who has made and tracked changes in a document, so it can actually be any color at all. That’s why I’ll be referring to “colored” text and marks and not “red” ones. Note also that the version of Word the images were taken in is Microsoft Word for Mac 2011. Other versions of Word will have the same functions, and track changes translate fine across versions when you share files, but there will be differences in the user interface (menus, toolbar, ribbon, etc.). Insertions: If the editor inserts material, it will simply appear as colored text amid the original text. In the sample, the first insertions are On, in a fashionable bar, and women’s. Deletions: Deletions are listed in the right-hand column. Within the text, you can see little tags at the former location of the deleted text (look, for example, to the left of the first word, “On,” from which "It was" was deleted). Light dotted lines extend from those little tags to the bubble in the column for more information, including a timestamp and the name of the editor (or the name entered in that person’s copy of Word). Formatting: The italics applied to the text Skating Circles on the third line is a formatting edit. You can see the explanatory bubble on the right that says “Formatted: Font: Italic” and the light dotted line pointing to the phrase. Comments: While comments are not really edits, your editor might leave them for you, and their visibility is handled in the same place as the other edits mentioned here. I like to leave comments when the reason for a change I make might not be obvious or governed by common grammar, style, or other applicable guidelines. The comment in this example explains a subjective edit that the author might disagree with or might like to edit even further. Other comments might highlight unclear or ambiguous wording; if I don’t understand what an author wants to say, I can’t edit the text until learning from the author what they meant. Moves: Word tracks when the editor moves text, but it seems inconsistent about how it displays the change. Sometimes you’ll see it labeled as a Move (generally in a different color from the other edits), but most of the time the edit gets tracked as a deletion in one place and an insertion in another. See, for example, the deletion and insertion of in a fashionable bar in the sample text. How to Work with the Document after Viewing the ChangesThe editor has sent you an edited version of your document with lots of changes tracked, and now you want to look at the edits and decide which to keep and which to reject. Find the Review area in Word’s ribbon or toolbar and then look for the two page icons, one with a check in a green circle and the other with an X in a red circle. These are your accept and reject tools. Accepting changes individually: If you want to look closely at each change the editor has made before accepting it, then put your cursor at the location of the first change you want to assess. Next, click the icon with the checkmark to accept or the X to reject the change. The cursor will move automatically to the next one. You can skip forward and back to later or earlier changes without accepting/rejecting them by clicking the page icons with the arrows. Accepting changes by paragraph or section: If there are a lot of edits, then it might be tedious to click the icon separately for each one. You can accept (or reject) all the changes in a given section by reading through a section (sentence, paragraph, page, etc.) to review the edits, highlighting the section you’ve just read through, and then clicking the checkmark icon. If there are specific changes you’d like to reject, reject those first before highlighting the section you’d like to otherwise accept. Accepting all the changes at once: If you’re in a hurry or trust the editor implicitly, you might prefer to accept all the changes in the document in one click. Click on the tiny down arrow next to the checkmark icon to find “Accept All Changes in Document” (and other options that might be of interest). After you accept changes, it's best to save the document under a new file name. Other Views while Changes Are TrackedMaybe you don’t want to accept the changes just yet but want to see what the document would look like without all the colored markings. The two dropdown menus in figure 3 can help with that.
The dropdown that says “Final Showing Markup” in figure 3 also contains the options “Final,” “Original Showing Markup,” and “Original.” Final will show you what the document will look like if you accept all the changes. Original Showing Markup displays all the marks but does so differently, privileging the original text and showing the edits in color; for example, the deletions and insertions will swap places. Original, of course, shows the document before any changes were made. The “Show Markup” dropdown allows you to display or hide specific types of edits. I find this one useful on documents with a very large number of changes, since a great deal of markup can not only obscure one’s view of the text but even slow down performance using Word itself, making it difficult to scroll or type. As the writer, you might find it useful for focusing only on certain types of edits at a time. Just bear in mind not to forget that you hid changes and to make sure everything is either accepted or rejected before you share the document with others. They will be fully visible to anyone you send the document to. This is not an exhaustive tutorial for using track changes but a basic introduction meant for writers who are new to working with an editor or proofreader who uses them. Some explanations also might be influenced by my own habits in using track changes. If you have any additional tips or suggestions to offer, I welcome them in the Comments section.
1 Comment
10/28/2021 07:32:49 pm
An extraordinary content performed by them. this post will truly help up their ethical when the entertainers in it will see it. A little video clasp of this demonstration must be transferred with this post this may build their fascination of post. By the way an incredible post to peruse. Continue sharing it.
Reply
Leave a Reply. |
Archives
March 2017
CategoriesAuthorI'm Lea, a freelance editor who specializes in academic and nonfiction materials. More info about my services is available throughout this site. |


 RSS Feed
